

- Docs
- Get started
- Contact Page
Contact Page
Overview
Each lead’s information is carefully housed in their personalized page. Here’s how you can find and navigate to each Contact Page, make edits, and adjust notes:
Navigating to the Contact Page
There are a few ways you can navigate to a lead’s Contact Page by clicking on the Lead’s name in these places:
Toggling Between Lead Information, Notes & Call Logs
At the top of the Contact Page, you’ll find three options. To switch between them, click the option. Here are the three options:
Lead Information: Default page that shows you the Initial Lead Information & more
Notes: Sends you to the Notes Logs for that lead.
Call Logs: Displays the history of calls between you and the client.
Initial Lead Information
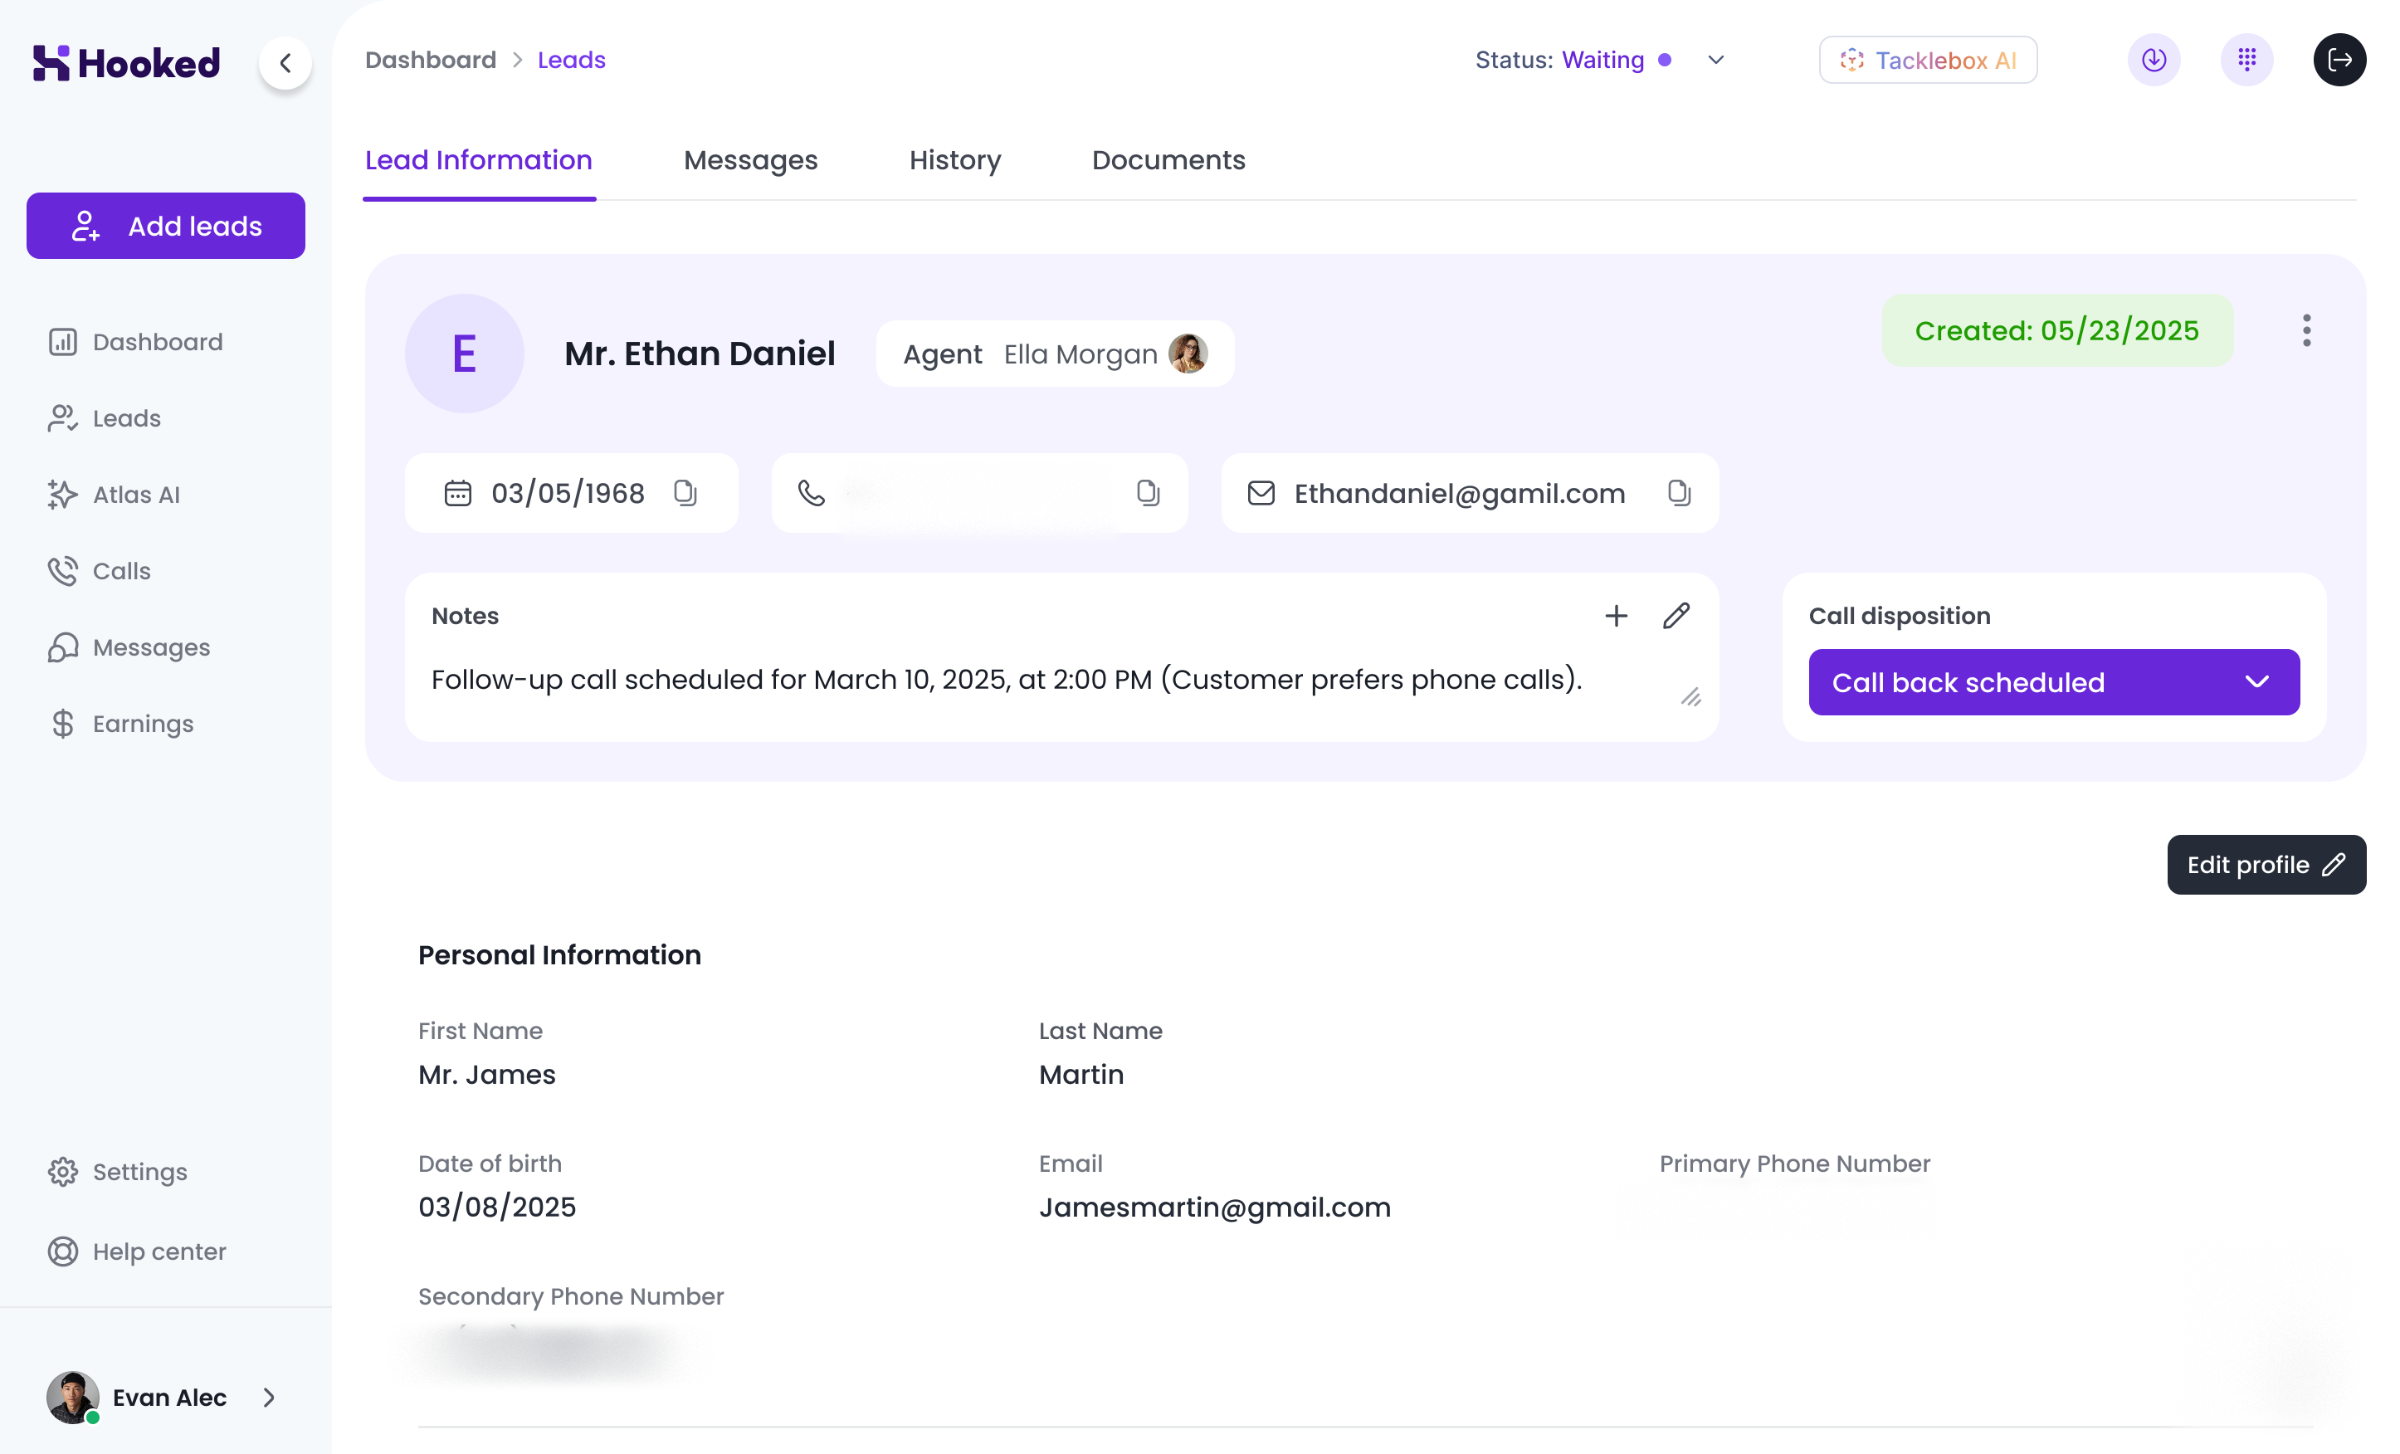
When you open a lead’s Contact Page, you’ll be greeted with the following information:
Lead’s Name
Lead’s Phone Number
Lead’s Email Address
Most Recent Notes
Call Disposition.
The lead’s phone number and email address can be copied via the Copy button next to the corresponding information.
Adjusting the Call Disposition
You can adjust the call disposition from the contact page from the Initial Lead Information Card. This option can be found under the Call Disposition card at the bottom right of the initial lead information. Either click on the initial option or the Down Arrow to open up the menu.
From there, you can choose any option to change the call disposition.
Managers or supervisors can block some dispositions. If you aren't sure which category to place your call under, contact your supervisor for the most applicable options.
Merging & Deleting Leads via the Contact Page
Merging and deleting leads is simple from the Contact Page. Simply click the three dots at the top right of the initial lead information card, and you will find the Merge Lead and Delete Lead options.
When you click Merge Lead, a pop-up will appear, and you can choose the contact to merge with.
The Delete Lead button will display a pop-up asking if you’re sure. Once confirmed, the Lead will disappear.
Some of these options may be restricted to your account based on your status. If you can't make those adjustments, contact your manager or supervisors.
Adding to the DNC & Blacklist
The DNC and Blacklist were created to warn and block incoming calls that have led to aggressive confrontations and non-committal interactions.
By clicking on those options from the menu on the initial lead information card, you can add that contact to the Do Not Contact list or Blacklist.
Reviewing & Editing Notes via the Initial Lead Information Page
On the Initial Lead Information card, you will be greeted with the latest notes created for that lead. This will give you quick access to the last conversation your agency had with the lead and provide a reference for the next one.
If you need to add or edit notes, click on the Add or Pencil icon. Once clicked, you can add or make edits directly to the notes section of the Initial Lead Information card. Once the additions or changes are made, click the Save Note or Save Changes button.
Contact Page: Lead Information
Within the Contact Page, you will find all the Lead Information that AI Automation filled out and any additional notes that Live AI Assist created. Here’s what you’ll find on the Contact Page:
Personal Information
Title
First Name
Last Name
Gender
Date of Birth
Email
Primary Phone
Secondary Phone Number
Sales & Business Information
Campaign
Call Disposition
Assigned Agent
Vertical
Carrier
Policy ID
Coverage Amount
Annual Premium
Payment Date
Sale Date
Address Information
Address
City
State
Zip Code
Additional Information
Primary Beneficiary
Beneficiary Relationship
Tobacco Use
Health Status
Editing the Lead Information Page
If you need to adjust the Contact Page, click on the Edit Profile button at the top of the Lead Information. Any of the fields can be adjusted by interacting with them.
Once you’ve finished editing the Contact Page, you can click Save Profile to retain the changes you made. If you want to revert the page to what it was before you made edits, click Cancel.
Deleting a Lead Information Page
Deleting a contact on your Leads Page can be done on the Contact Page. You can delete a contact by clicking Edit Profile and selecting Delete Account. By confirming the erasure of the Lead, it will disappear from your Hooked Account.
Some of these options may be restricted to your account based on your status. If you can't make those adjustments, contact your manager or supervisors.
Adjusting the Notes Logs
When you click the Notes option, you’ll be taken to the Notes Logs. This page displays all the notes for the leads from your call agents.
You can refresh the page of notes by clicking Pull Latest Notes or edit notes by clicking the Pencil Icon at the top right of a note card. If your notes are lengthy, Hooked will give the first few lines, and you must click the Expanding Arrow Button at the bottom right of the card to expand the notes.
Navigating the Call Logs
After you click Call Logs from the list of options, you’ll be sent to the Call Logs page. This page shows your call history between you and your lead. Here is the baseline information you’ll get on this page:
The agent who handled the lead
Date the call occurred
Duration of the call
Direction of the call (Outbound or Inbound)
You can also listen to the entire conversation by clicking the [Sound Wave Icon] and download the audio file by clicking the Download Icon — both found under the Action column.